Audio and Video
You have learned the basics of coding and animation so far. Additionally, p5.js makes it easy to incorporate advanced features like using cameras and microphones. As one of the most popular of these, this chapter introduces libraries for handling video and audio.
Note
- The programs introduced here use your microphones and webcam on your computer. Allow the browser to use them if it asks you.
- If you have OpenProcessing and this textbook open at the same time, the camera may only work in one of the windows. If this is the case, be careful to make sure that the window is selected.
- Please be patient as the samples may be slow to load in this chapter.
Display Video from a Camera or File
p5.js allows you to use webcams and video files. The only difference is the source of the video information, but you can handle both in the same way.
Use Video from your Camera
The following program simply displays the video acquired from the camera.
let capture;

function setup() {
  createCanvas(windowWidth, windowHeight);
  capture = createCapture(VIDEO);
  capture.hide();

  // print resolution of the camera (pixels)
  print(capture.width);
  print(capture.height);
}

function draw() {
  let frame = capture.get();
  image(frame, 0, 0, height*(capture.width/capture.height), height);
}
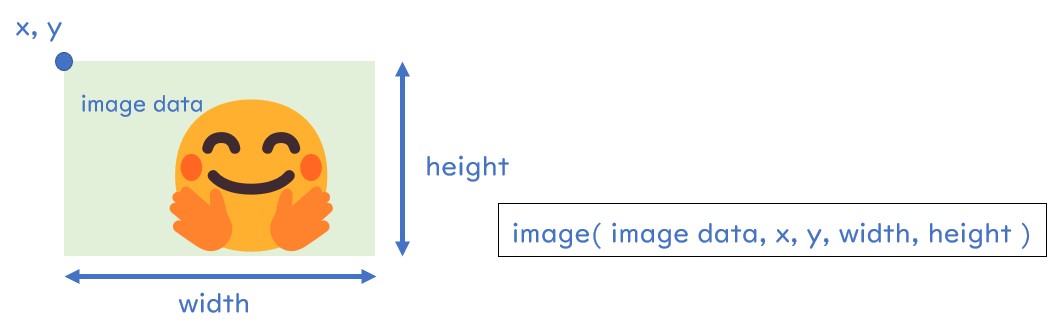
To use the camera's video, first create a variable in setup with the functionality to manage the video.
The capture variable contains various functions, which you can call using the dot ..
For example, in draw block, we invoke the function get() to retrieve the camera image, and copy the image to the frame.
Finally, use image( image data, x-position, y-position, width, height ) to place the image on the screen.
The positioning and size of the image are the same as for rect().
By the way, the image is actually placed on the screen at the time of
createCapture(VIDEO), but it cannot be combined with any animation defined indraw(), such as displaying other shapes. To avoid this,capture.hide();is used insetup()to prevent the image from being displayed automatically. Then again, we usedimageindraw().
Use Video Files
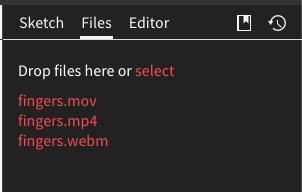
You can also upload and use your own video files. First, go to the Files tab on the right side of the editor and upload the video files you wish to use.
To load a video, type createVideo("filename");.
Also, use the loop() function to start playback.
The other usage is the same as what you did with the camera: extract one frame of the image with the get() function and place it with the image function.
let vid;
let i=0;

function setup() {
  createCanvas(400, 400);

  vid = createVideo("fingers.mp4");
  vid.loop();
  vid.hide(); // hides the html video loader
}

function draw() {
  let frame = vid.get();
  image(frame, 0, 0, 400, 400); // redraws the video frame by frame in

    i++;
    if(i>400){i=0;}
  circle(400 - i, 350, 48);
}
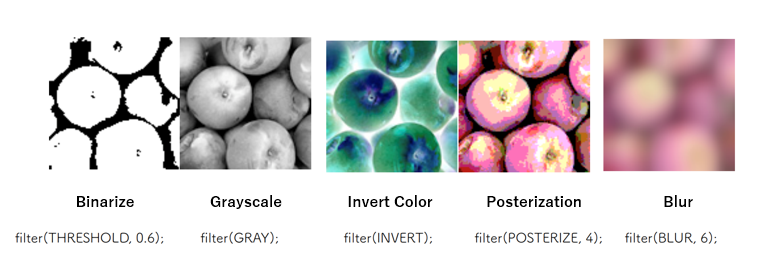
Apply Filters to an Image
A frame taken from a video image can be easily processed by using the filter() function, such as frame.filter().
Check the arguments to be given by yourself.
https://p5js.org/reference/#/p5/filter
let capture;

function setup() {
  createCanvas(windowWidth, windowHeight);
  capture = createCapture(VIDEO);
  capture.hide();

    // print resolution of the camera (pixels)
    print(capture.width);
    print(capture.height);
}

function draw() {
    let frame = capture.get();
    frame.filter(THRESHOLD, 0.4)
    image(frame, 0, 0, height*(capture.width/capture.height), height);
}
The following program allows you to split the screen and list several filter effects.
let vid;

function setup() {
  createCanvas(800, 800);

  vid = createVideo("fingers.mp4");
  vid.size(width/2, height/2);
  vid.loop();
  vid.hide(); // hides the html video loader
}

function draw() {
  // normal on top left
  {
    let frame = vid.get();
    image(frame, 0, 0); // redraws the video frame by frame in
  }


  // invert on top right
  {
    let frame = vid.get();
    frame.filter(INVERT);
    image(frame, width/2, 0);
  }

  // blur on bottom left
  {
    let frame = vid.get();
    frame.filter(BLUR, 4);
    image(frame, 0, height/2);
  }

  // posterization on bottom right
  {
    let frame = vid.get();
    frame.filter(POSTERIZE, 3);
    image(frame, width/2, height/2);
  }
}
You can also use frame() as a function to apply image processing to the entire screen.
let capture;

function setup() {
  createCanvas(600, 400);
  capture = createCapture(VIDEO);
  capture.hide();
}

function draw() {
  let frame = capture.get();
  image(frame, 0, 0, height*(capture.width/capture.height), height);

  fill(40, 240, 240, 100);
  circle(width/2, height/2, 300);

  filter(POSTERIZE, 3);
}
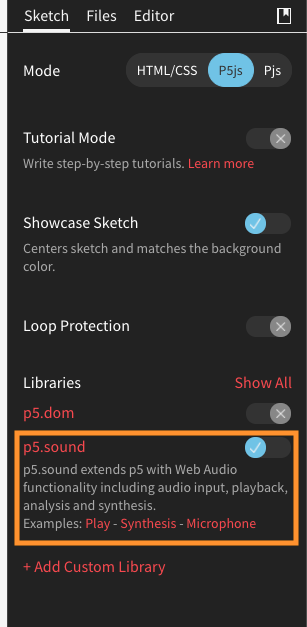
Sound Library
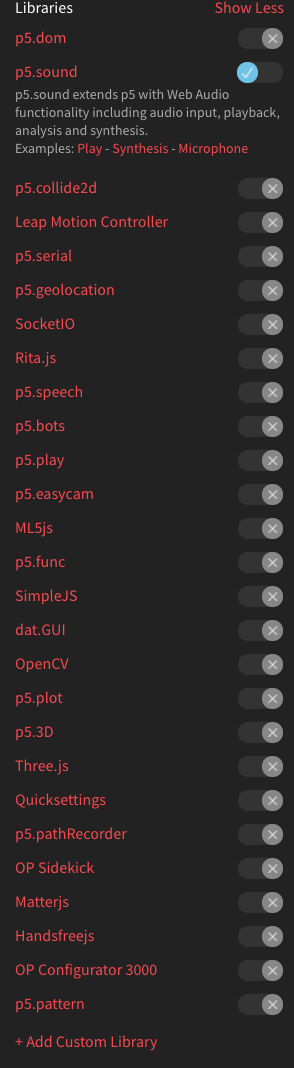
A library is a collection of functions related to a specific process. By activating the sound library from the right tab, you can use it for various sound-related processes.
Sound Input from a Microphone
The following program is a circle that changes its size according to the volume of the input sound.
let mic;

function setup() {
  createCanvas(windowWidth, windowHeight);

  mic = new p5.AudioIn();
  mic.start();
}

function draw() {
    background(150);

    let vol = mic.getLevel();  // Get the overall volume (between 0 and 1.0)
    circle(width/2, height/2, 100+200*vol);
}
If you want to change the animation based on the sound of the microphone, use p5.AudioIn() to create a variable that controls the microphone.
Call getLevel to get the volume.
Use Audio Files
The sound library also allows you to upload audio files for playback.
You can load a sound file like dingdong = loadSound('filename') and play it with dingdong.play().
Additional functions can be found here.
You can use images and audio files under the Creative Commons License in your works without copyright issues. Search for "CC0 sound" or "CC0 image". To find audio files, freesound is useful (registration required).
The following program is a doorbell that makes a sound when clicked.
The DoorBell class is defined to have a method display() to draw a shape and a method contains() to detect the click position.
// A sound file object
let dingdong;

// A doorbell object (that will trigger the sound)
let doorbell;

function setup() {
  createCanvas(200, 200);

    dingdong = loadSound('bell.mp3');

  // Create a new doorbell
  doorbell = new Doorbell(width/2, height/2, 64);
}

function draw() {
  background(255);
  // Show the doorbell
  doorbell.display(mouseX, mouseY);
}

function mousePressed() {
  // If the user clicks on the doorbell, play the sound!
  if (doorbell.contains(mouseX, mouseY)) {
    dingdong.play();
  }
}


// A Class to describe a "doorbell" (really a button)
class Doorbell{
  // Location and size
    constructor(x_, y_, r_){
        this.x = x_;
        this.y = y_;
        this.r = r_;
    }

  // Is a point inside the doorbell? (used for mouse rollover, etc.)
  contains(mx, my) {
    if (dist(mx, my, this.x, this.y) < this.r) {
      return true;
    } else {
      return false;
    }
  }

  // Show the doorbell
  display(mx, my) {
    fill(175);
    stroke(0);
    strokeWeight(4);
    circle(this.x, this.y, this.r);
  }
}
Explore Other Libraries
In addition to camera and sound, there are many other libraries available. You can browse the list of available libraries in the Library section, and each item is linked to its description page.
Exercises
Exercise 1
Create an animation that moves in response to the volume of sound received from a microphone. You may implement any kind of interaction. But if you have no idea, choose one of the following and implement it.
- When you clap your hands, the ball starts to move.
- The animation progresses only while you are speaking.
Exercise 2
Next time, you will work on your final assignment. Check what libraries are available, and if you find one that looks useful, check out how to use it. (This question will not be graded.)