How to Use OpenProcessing and Program Structure
This chapter first describes the programming environment used in this class. It also describes the overall flow of creating programs in order to get used the tools. Finally, the most basic structures and rules of the programs covered in this class will be explained.
How to use OpenProcessing
OpenProcessing is a service that allows you to write and share programs online. This section explains how to create a program.
In this class, we use OpenProcessing Class to share the teaching materials and to submit your works. Please join the class from https://openprocessing.org/join/1724F1.
Write and Run a Program
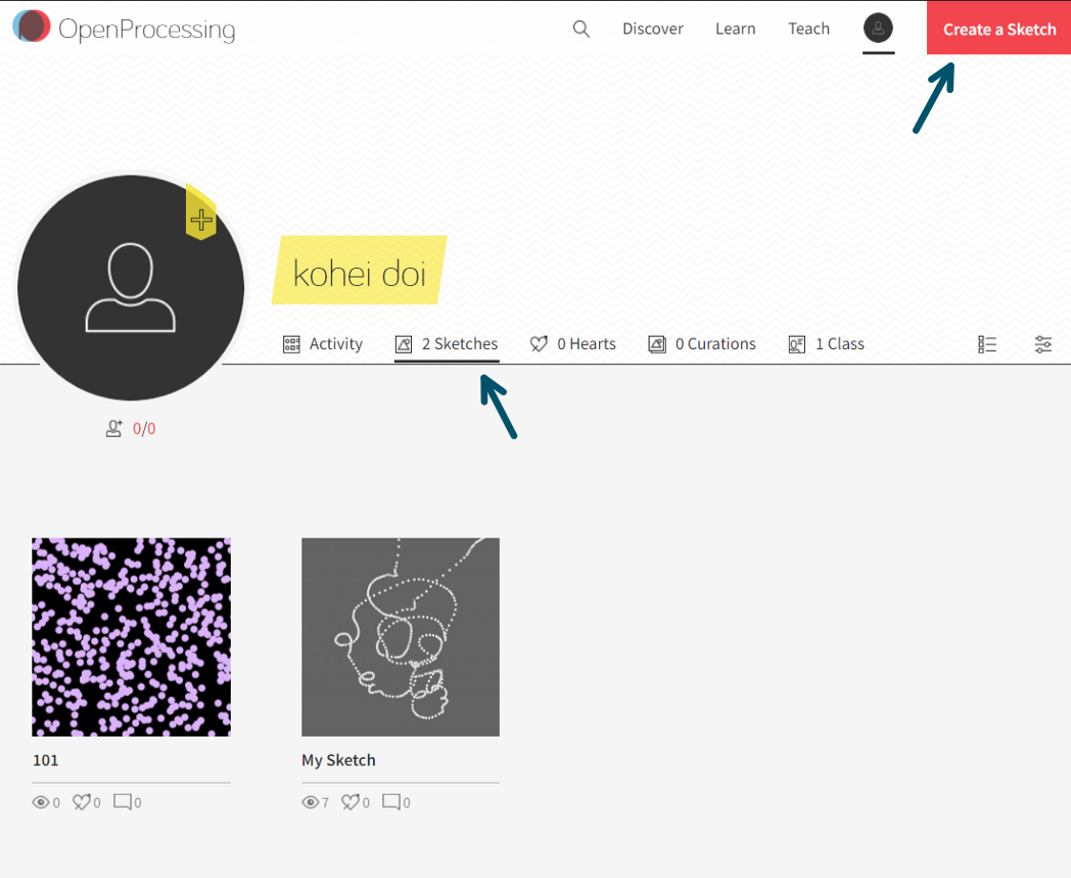
A program in OpenProcessing is called a sketch. First, we will explain how to create and run a sketch on the browser. After you log in to OpenProcessing, your profile opens as follows. In particular, in the Sketches tab you can see a list of programs you have already created. Now let's create a new sketch from the Create a Sketch button on the top right of the screen.
The Editor
When you create a new sketch, the editor opens. The left area is where you write your program. When a sketch is created, a program in which the circle follows the mouse is provided as default. The right side is the settings panel. In the Editor tab, you can set the font size, theme, syntax checker, etc. Press [x] button to close the panel.
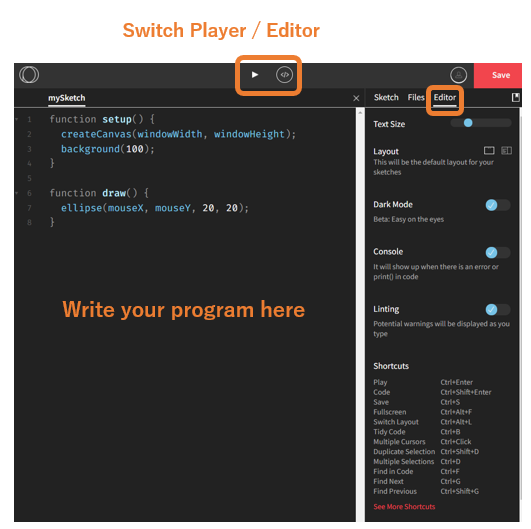
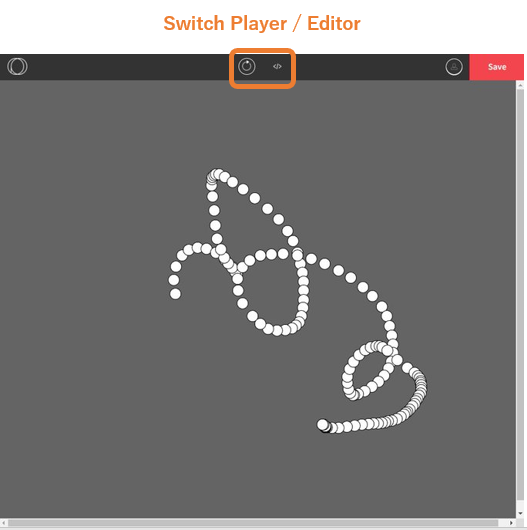
The Player
To run your program, you have to move to the player tab. Switch the tab from the button on the top then soon your program start running.
Practice and Print Text to the Console
This is an exercise in manipulation. Go back to the editor tab, type in the following program and run it. (or you can copy and paste it's fine.) What kind of animation do you see?
[ Example 1-1 ]
function setup() {
    createCanvas(windowWidth, windowHeight); // set the drawing area the same as the window
    colorMode(HSB, 100); // specify the color space as HSB
    background(0); // fill the background with black

    print("Hello, World!"); // Output the string "Hello, World!" to the console
}

function draw() {
    fill(random(100), 30, 100); // Randomize the color of the shapes
    circle(random(windowWidth), random(windowHeight), 30); // Draw a circle in a random position
}
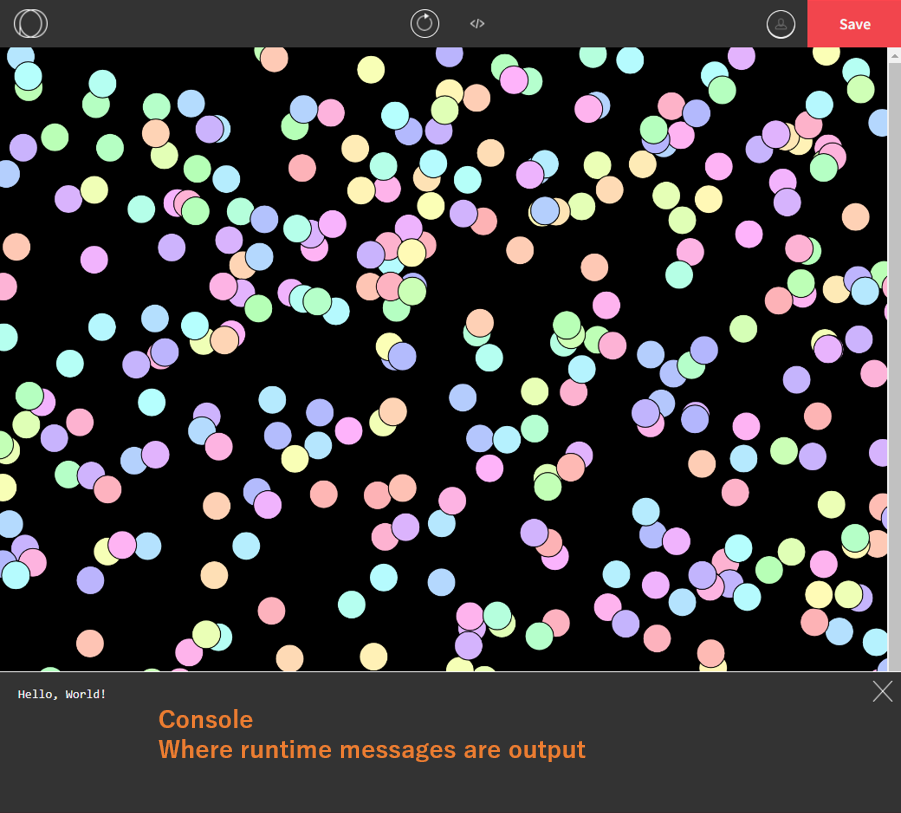
"Hello, World!" at the bottom pane.
This area is called the console and is where the program displays some text.
(Press >_ button to bring up the console in this player embedded in this text.)
You can display any text you define in the console, as well as an explanation of any errors that you met.
It will be useful later when you write a difficult program, so keep it in mind.
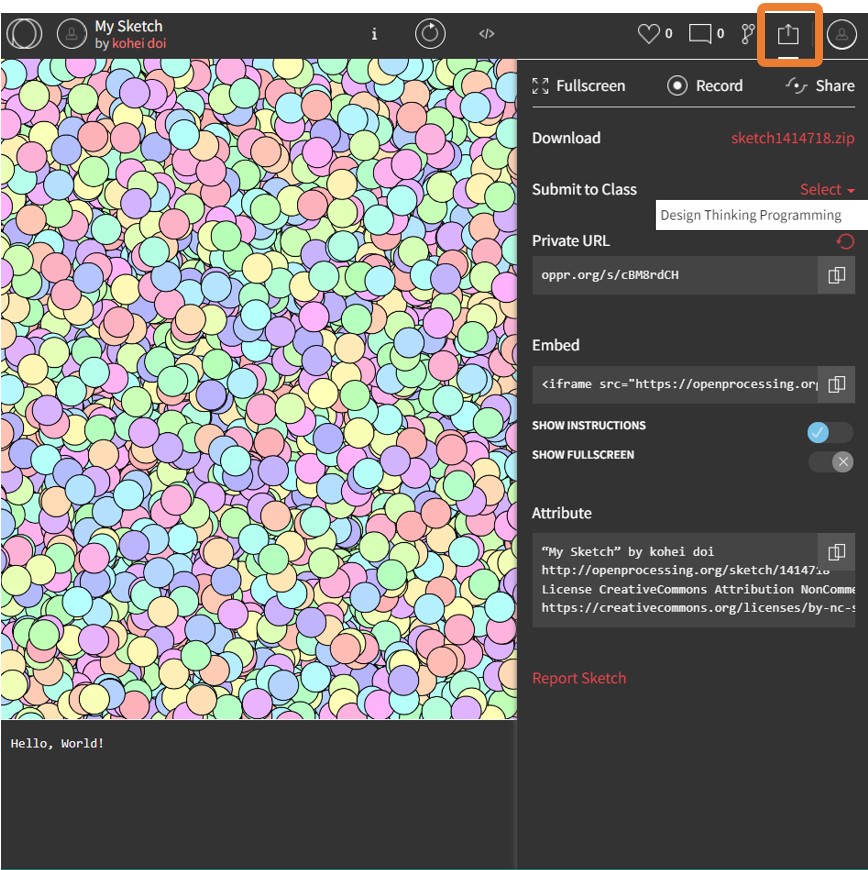
Save and Share your Sketch
You can save the program from the Save button on the upper right. If you are saving for the first time, give the sketch a name. Press Submit in the upper right corner to finish saving. Go back to your profile page and confirm that the sketch is saved.
You can share your saved sketches with others. Open the Share panel in the upper right corner of the editor to download files, submit to class, or retrieve URLs. To submit an assignment for this class, select "Design Thinking Programming" from "Submit to Class" section and share your sketch. You can also submit through Add Sketch button, which can be found on the class page.
Use Published Programs
You can copy a program that others have published and make your own modifications to it.
This is called forking a program.
Press the button  in the upper right corner of the sketch you want to copy, and the same sketch will be saved as your own.
You can use this feature to modify class samples or to create assignments.
in the upper right corner of the sketch you want to copy, and the same sketch will be saved as your own.
You can use this feature to modify class samples or to create assignments.
Program Structure
In the previous section, we ran a program in which many circles appear on the screen, but how does the program we wrote behave? At the end of this chapter, we will explain the most basic rules and structure of programs using p5.js, so you can understand how the program in Example 1-1 works.
Syntax Basics
Arrange sentences in sequence to form an action
Lines 2 through 6 of Example 1-1 give instructions to the computer in the following order
- set the drawing area to match the width and height of the window
- set the color expression method to HSB (the expression method will be explained in later chapters)
- Set the background color to 0 (=black)
- Output "Hello, World!" to the console
createCanvas(windowWidth, windowHeight);
colorMode(HSB, 100);
background(0);

print("Hello, World!");
In the example above, each line of instruction is called a statement.
You must always end a statement with a semicolon ;.
Although the convention is to write one statement per line, writing multiple statements is technically not a problem as long as there is a semicolon.
Conversely, it is not acceptable to break a line but without a semicolon.
Calling Functions to Execute
A single instruction to be executed by a computer is called a function.
To call (execute) a function, the necessary information is given using parentheses ().
The following statement calls the function named circle to draw a circle at coordinates (x, y)=(100, 200) with the radius 30.
Data (10, 20, 30) given to a function, such as coordinates, are called arguments. The number of arguments to be provided is determined for each function, and the program must be written in accordance with the specifications. In the example above, three arguments are required, which must be the x-coordinate, y-coordinate, and radius, in that order. There are also functions with no arguments, which also require empty parentheses.
Comments
To make it easier for the reader (including you) to understand your program, you can freely leave comments in your program.
A double slash // to the end of a line is a comment and does not affect the program.
The figure below summarizes the above.

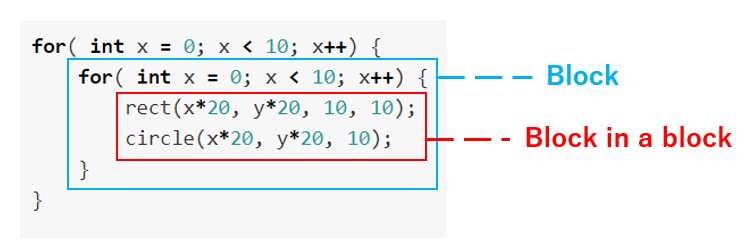
You can group a series of processes in curly braces {}
Sometimes you want to combine several statements into one.
By enclosing statements in curly braces {}, you can create a group of statements called a block.
Blocks can also be nested within blocks.
It is customary to indent the beginning of a line when creating a block to make it easier to read.
How animation works - setup and draw
p5.js provides the framework setup and draw to easily create animations.
Animation is a series of images that change little by little on the display, and there are many things we need to control.
However, by letting p5.js do the part of displaying many images sequentially, we can focus our thoughts on what to draw in a single frame.
Similar processing is repeated when drawing each screen, but by entrusting the control to the functions of p5.js, we can concentrate on what to draw in a single frame. can do.
In p5.js, the process for drawing each frame, which is the body of the animation, is written in the draw block.
The process written here is repeated until the program ends.
In Example 1-1, there is fill function to specify the drawing color and circle to draw a circle.
function draw() { // this block is executed repeatedly
    fill(random(100), 30, 100);
    circle(random(windowWidth), random(windowHeight), 30);
}
On the other hand, processes that need to be done only once, such as setting the screen size, are done in a block called setup.
In Example 1-1, the createCanvas function for setting the screen size and the background function for setting the background color are executed in the setup block.
The elements set here will not change throughout the animation unless you rewrite them again in a block of draw.
function setup() { // this block is executed once at the beginning
    createCanvas(windowWidth, windowHeight);
    colorMode(HSB, 100);
    background(0);

    print("Hello, World!");
}
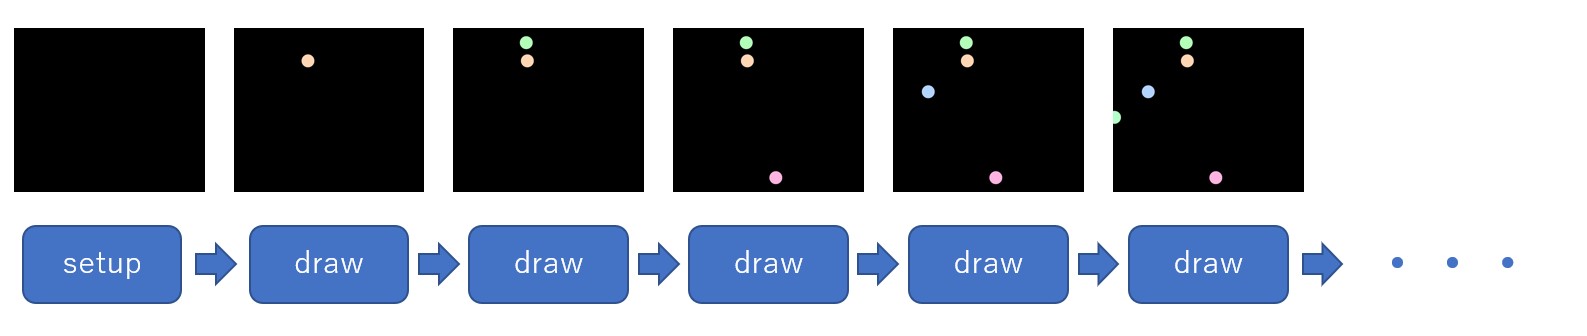
The animation of Example 1-1 can be broken down frame by frame, as shown in the figure below.
At the beginning of the program, the background is initialized by setup.
After that, the process of "drawing a circle" described in the draw block continues endlessly.
Exercises
Use the sketch Example 1-1.
Try moving where you write the functions and see when setup and draw are executed.
There is nothing to submit for this exercise.
- Move
print("Hello, World!");intodraw. - Move
fill(random(100), 30, 100);intosetup. - move
background(0)to the top ofdraw